





Just got your hydrophone, or still thinking about getting one? No worries! Here's everything you need to know to use it well, from plugging it in to the different heads.
Every Manalive Audio hydrophone is handmade. With its interchangeable heads and tips, it can do a lot: in icy or very hot water, above ground or below it, it lets you create and listen to unique sounds. The capsule and electronics are protected by a waterproof acoustic gel, behind airtight walls: the mic stays waterproof while keeping as much frequency range and sensitivity as possible.
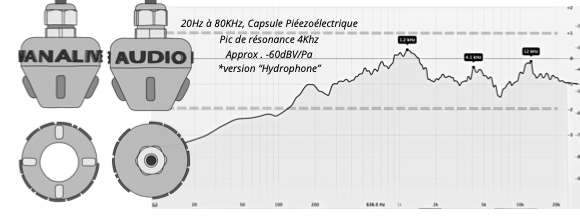
Not equipped yet? Discover the Manalive Audio hydrophone and its recordings
What you need to listen
The hydrophone needs a device that amplifies its signal: a recorder, a sound card or a small mic amplifier. Careful: it won't work plugged straight into a phone, a speaker or a computer!
Here are some devices that work with it:
- Zoom recorders : H4, H4n, H4n Pro, H5, H6, F3, F6
- Sound Devices recorders
- Smart Rig II and other phone interfaces: you need an app and a phone with a mini-jack input, or an adapter
- PA speaker with a mic input
- HoneyTone Amp : the best choice in my opinion for simply listening at sea, without recording
Connecting your hydrophone
- Plug the hydrophone into your device's mic input. Check that the plug matches your model: 3.5 mm mini-jack, 6.35 mm large jack or XLR.
- Turn the gain up quite high: a hydrophone's signal is weak and needs plenty of amplification.
- Connect your headphones or a speaker to your device's output.
- Don't switch on 48 V phantom power: the piezoelectric capsule is passive and doesn't need it.
Haven't picked your connector yet? All three versions come with a 3 m or 8 m cable. See the hydrophone versions and prices
Hearing hiss?
If you hear hiss, it's often because your device's preamp isn't strong enough. There's a handy fix for the XLR version: the Triton Audio FetHead. Powered with 48 V by your recorder, it adds gain to any dynamic or passive mic, without sending the 48 V to the mic.
A few precautions
- Don't unscrew or force the top part: you could damage the microphone.
- Keep it away from electronic devices, which can cause interference and unwanted noise.
- Operating temperatures: from -30 °C to +96 °C.
- The plug is not waterproof: avoid leaving it in damp conditions for long.
With a little care, your hydrophone will stay with you for years. See how to rinse and look after your hydrophone
Interchangeable heads
This is what makes the Manalive Audio hydrophone so versatile: the head swaps in seconds, depending on what you want to record.
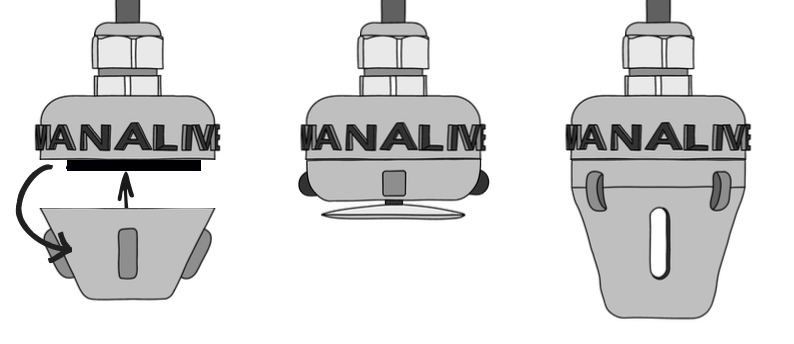
- Weight (supplied with the hydrophone): heavier, to sink deep.
- Float : lighter, to stay on the surface.
- Magnet : slimmer, with a magnet to attach to metal walls.
- Suction cup : slimmer, with a suction cup to attach to flat surfaces.
- Ground Spike : a spike to pick up ground vibrations.
- Bait : a cavity to lure fish with bait.
Bonus: all these heads also fit our geophone, to listen to the ground. Discover the geophone
One last tip: make sure you use the right connector for your device! XLR, mini-jack or large jack, the choice is yours.
Read next
- Caring for your hydrophone: rinsing, cable and connector
- Buy a Manalive Audio hydrophone: versions and prices
- Listen to recordings from the community
- All the answers in the FAQ
Sources
The specifications of our microphones come from our own measurements and product sheets. For everything else, here are the references this article is based on.
2 Comments
Hello, is it systematically necessary to have an amplifier before the recorder? I'm not sure I understand correctly. Thank you for your reply.
Hello! You do indeed need an amplifier upstream of your hydrophone, however if you have a portable digital recorder, they are included in the device, so the recorder alone is sufficient!